Thursday, October 25, 2012

Ghost Cookies

Yay! Holiday season has begun!  The next couple months are fabulous for bakers and crafters; you just roll from one holiday to the next. If you have a chrysanthemum out, the Halloween lights up, pumpkin bread made, and the pumpkins ready for carving, the only thing missing (besides a great costume,) is the ghost cookies!
This cookie is lots of fun to make for Halloween parties and a good cookie to make with kiddos!

Tidbit: For those of you who don't know what a "snack-tivity" is: this is a perfect example. Both a fun activity and a snack in one! Basically, an edible craft! Let's get started!

Supplies:
Nutter Butter cookies (Need I warn you not to feed these to the peanut allergy kid.)
White chocolate chips (Don’t spring for the nice Ghirardelli ones like I did. The cheap baking ones work best for melting!)
Mini chocolate chips
Parchment paper, wax paper or a silicone baking sheet

Before melting your white chocolate, get everything ready so that you can work fairly quickly once the chocolate is melted. Have your cookies out of the packaging, some mini chocolate chips on the counter, and some wax paper laid out. (Feel free to start the snacking part now if you are suddenly a bit hungry!)


Melt your white chocolate in either a double boiler or a microwave-safe bowl. Check the directions on your chips since all have different directions regarding microwaving. Don’t microwave too long, as the chocolate will melt and then harden. Stir frequently. You are ready to go once you have a nice smooth consistency.
Take your cookie and dip it into the white chocolate about halfway. 

Confession: This is the second time through because that Ghirardelli chocolate didn't melt well :(
Lay the cookie on the wax paper or a baking sheet. Put your mini chocolate chips in as eyes. Don't dip them all before giving your ghosts' eye balls because it will be too late. Dip a couple and then give them sight.
 Give the cookies some time to harden on the parchment paper. Enjoy!

Thursday, September 13, 2012

A Little Mini World: Creating your own Terrarium

If you are like me, you fall in love with most things that come in a mini size. After all, most things are cuter when tiny; puppies, cupcakes, mini spatulas, baby toms and uggs, tiny play kitchens, and the list goes on. But a mini garden… this sounded absolutely enchanting to me! Obviously, you can see why I fell in love with the new craze for terrariums! It’s a mini living world growing inside a glass container. And need I mention, for those of you with a black thumb similar to mine, the promise that these hearty plants only need watering every couple weeks?! 

The amazing terrariums at high end nurseries can get quite pricey. Although making my terrarium cost more than I was expecting, it was still way cheaper than buying one, it was  tons of fun designing, and it turned out completely unique. If you are not sure this is the craft for you, search for pictures of terrariums online or go to a nursery and you will instantly fall in love and be inspired to design your own mini world in a glass! I promise!

Supplies:
A glass container- You can find very unique looking glass terrarium vessels at various stores or I just bought a large candle holder for $2 at world market. Even though a lid would look neat, moisture will accumulate on the inside of the glass, so go for one with an open top.

Activated charcoal- Some pet stores sell it in the fish department.  I found a nursery that sold me 1 cup for $1 (Thanks Mel’s!) My chemistry expert sister Bridget explained that the charcoal gives off nitrogen, which helps with air filtration which is very good for the soil.

Rocks/Pebbles- I biked down to the river to collect some nice smooth river rocks.
Collecting river rocks (yes its dark and yes I'm wearing a helmet!)
Cactus soil- You can buy this or just mix equal parts potting soil with sand.

Sand- Another ingredient I biked to the river to get, you can  take some from a park.

Decoration- I had a sea shell that I wanted to showcase but then I also found some neat moss that I included.

Succulents- Shop around. I didn’t have any luck at Home Depot; they just had outdoor hen and chicks. I bought my succulents at a nursery with a neat selection. But, then I went to another nursery to get the charcoal and found that they had succulents that were even smaller; too bad. Succulents typically run from $3-5/plant. Be sure to bring your glass container with you for sizing. Otherwise, you will do what I did, and think that you can fit way more plants than you can.

Kitchen spoons and a straw
My assorted supplies on the porch ready for creation time!
Make any of your layers thicker or thinner depending on the size of your container and how high you want your plants. I was hoping to be able to see the different layers better in my container, but I did my layers pretty skinny so that the entire plant would be encased in the glass.

The order of your layers is charcoal, rocks, soil, and then your succulents. Tuck your succulents into the soil by digging a small hole for the plant and then loosening the root ball once you remove it from the plastic pot. You can either put some little pebbles on the top layer or some sand or just stick to the soil as your topping. Then you can add any decorations such as seashells, pine cones, moss, or other knickknacks.
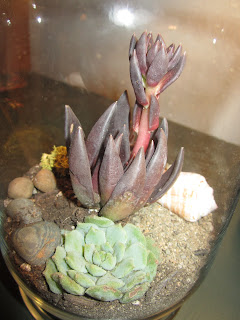
Looking down inside the terrarium
Terrarium tips:
-When putting your charcoal, soil, or sand in, do small bits at a time with a spoon so that you don’t get the inside edges of the glass dirty. Hand place rocks for the same reason.
-Once it is complete, use your straw to blow sand or dirt off your plants. This way you don’t blow the sand into your face but you get plants cleaned off. You can also use your straw to blow a neat wind swept look into your sand. I also dipped my straw in a cup of water to water my plants without watering the entire terrarium.
-Don’t put a lid on your terrarium as it will get very warm inside, baking the plant and causing condensation.
-Keep your terrarium in a location that is sure to get some sunshine.

The fun thing that I like about the terrarium is there is so much room for creativity. You can make yours look like whatever you imagine. I think that next I want to try is to make mini terrariums in a jam jar or in a bottle! I’ll keep you posted on my creations.  Keep me posted on yours!


Sunday, July 1, 2012

Little Debbie's Oatmeal Cream Pies


Who doesn’t have a soft spot in their heart (or stomach) for Little Debbie’s delectable treats? When it comes to her Oatmeal Cream Pies, I sure do!

This recipe is courtesy of my own Little Debbie, fellow nurse at Sacred Heart! Debbie is a fabulous baker and after trying her oatmeal cream pies I knew I wanted to give them a try. They were not hard to make and turned out fabulous! Make sure to give yourself plenty of time when baking these, since you need time while the cookies cool.

Oatmeal Cream Pies
Ingredients:
Cookies:
1 ½ c. flour
1 tsp. baking soda
½ tsp. salt (I never add salt you know!)
¼ tsp. ground cinnamon
3 c. uncooked oats
1 ¼ c. (2 ½ sticks) unsalted butter, softened
1 c. firmly packed light brown sugar
½ c. white sugar
1 large egg
2 tsp. vanilla extract
Cream filling:
6 tsp. unsalted butter, softened
2-3 oz. cream cheese, softened
2 c. powdered sugar
2 Tbps. heavy cream
1 tsp. vanilla extract

Cookies:
Preheat oven to 375*. Line baking sheet with parchment paper or a silicone baking sheet.
Wisk together flour, baking soda, salt, and cinnamon. Stir in oats. Set aside.
Beat butter, brown sugar, and sugar until creamy. Add egg and vanilla. Gradually add the flour mixture and mix well.

Using spoons, make rounded tablespoons and drop onto baking sheet. Bake 9-11 minutes. Allow the cookies to set on the pan for a couple minutes before removing to cooling racks. Allow cookies to fully cool before sandwiching.


Cream Filling:
Combine all ingredients and beat until combined. Increase the speed and mix till light and fluffy.

Match cookies so that each one has a comparable sized partner. Spread about 1 tablespoon of filling over the bottom side of the cookie. Then top with the cookie's partner, so that flat sides are together, with cream, creating a sandwich.
I packed up my oatmeal cream pies into a tin and took them across the country to Topsail Island, North Carolina for a 4th of July on the beach with my family! They loved them!!!
Adapted by my own Little Debbie from Bake or Break Recipes.

Glazed Lemon Icebox Cookies

This a famous cookie from our fabulous neighbor Jeanne! It is a wonderful travel cookie so its great for presents or mailing! Normally they are not pink, but you know my love for pink!

Glazed lemon icebox cookies
¾ c. (1 ½ sticks) unsalted butter, at room temp
¾ c. granulated sugar
2 ½ - 3 egg yolks
½ tsp vanilla extract
¼ tsp kosher salt
2 c. flour
1 c. powdered sugar
2 Tbsp. lemon juice
1 tsp grated lemon zest (OK to skip)

With electric mixer, beat the butter and the granulated sugar until fluffy. Add the egg yolks, vanilla, and salt; beat to combine. Gradually add the flour, mixing until just incorporated.

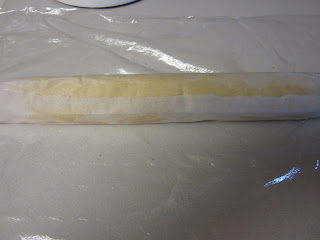
Divide the dough in half and shape into 1 ½ -inch diameter logs. Wrap in wax paper and then plastic wrap and refrigerate until firm, about 30 min.
Heat oven to 350*. Slice the logs into 3/8" thick pieces and space them apart on a baking sheet (lined with parchment paper or a silicone baking sheet. Bake until barely golden, 16-20 minutes. Then transfer to cooling racks to cool completely. (Error on the side of less is better, because you only want the bottom to be slightly golden.)


In a small bowl, whisk together the confectioners' sugar, lemon juice, and lemon zest until it forms a thick but pourable glaze, adding more lemon juice if necessary. Dip the top of each cookie into the glaze and let set about 15 min. (I just spooned some glaze on each cookie and then Maria followed me with a knife to smooth it out.) I added some pink food coloring to half the icing because I wanted some to be pink. However, I do think that they look better left alone, white.
To Freeze: Rather than refrigerating the dough, you can wrap up the logs and freeze. To bake, thaw just enough to slice the log and bake like above, using the upper end of the time range.

Recipe courtesy of my fabulous neighbor Jeanne! Thanks for the most amazing cookies always!

Shirring, or using Elastic Thread, on my BabyLock

Wow! It has been way too long since I have shared any good creativity on Glitters and Ribbons Please! Why have I not been blogging? It’s definitely not because Spokane has such sunny weather and I’ve been outside! It’s because I have been a sewing monster. Hopefully I’m not squinty eyed and hunch backed yet!

I thought I’d share a bit of sewing fun with you. I was introduced to sewing with elastic thread this summer. It is called shirring or smocking. I ran into quite some trouble trying to sew with my BabyLock machine. I read a thousand blogs on how to do it, and was beginning to seriously doubt my sewing capabilities, when I came across a blog that said that Brothers or BabyLock machines cannot shirr. So it wasn’t me, it was my STUPID MACHINE! Since I first got my BabyLock machine it has been nothing but a growing love affair. Obviously, I was distraught that I had found something that my machine was incapable of doing!

I called the fabulous ladies at the Creative Stitch in Littleton, Colorado and was reassured that neither I nor my machine was stupid. So for those of you out there frustrated and unable to shirr with a BabyLock, here’s your blog baby!

To begin, buy some nice elastic thread. As always, Gutermann has led my machine to nothing but success. Hand wind the elastic thread around the bobbin making sure it is snug. You don’t need to stretch it all the way out, but you don’t want it loose.

Insert your bobbin into the bobbin casing, pulling the thread past the tension spring. Using a small eye glasses screw driver, adjust the tension screw on the bobbin casing. I put mine about a quarter of a turn tighter (to the right).

Place bobbin casing into machine. Your top thread is just normal cotton thread that will show on the nice side of your fabric. Thread machine like normal.

Adjust thread length to longest stitch (mine was 4). You want your stitch to be just a plain-Jane straight stitch. When starting your shirring, you can reverse just like normal to knot the thread. When starting the next row, it is important to hold the fabric taught and sew straight so that the rows gather the same amount.
I bought an extra bobbin casing. This way I can have one that I adjust the tension on for shirring, and one that I leave well enough alone for all my other sewing. I marked my shirring bobbin casing with a dollop of nail polish to keep them separate. Definitely worth the $12 spent for an extra casing!

This is the scrub top that I made for my friend Brenda who just got a nursing job at Seattle Children’s. Woohoo! Go Brenda! She’s a skinny gal and since I didn’t have her here to fit it, the shirring in the back was a nice way to give it some shape without having to adjust the entire pattern. Lots of kids’ clothing has shirring so I think that will be my next project for my shirring summer!

check out the shirred back
Me trying it on!

Saturday, March 31, 2012

Crocheted Bunny Egg Cozy

This is the most amazingly adorable crocheting project ever! I first made these when I was doing my practicum in peds oncology. It was 2am on our lunch break when one of the other nurses showed me how. I couldn’t find the pattern this year so I thought I would just call over from my floor to peds oncology one night at work. As soon as I hung up the phone all the other nurses and the electricians that were on our floor erupted in laughter. As I was trying to explain myself and the project I made the mistake of using the phrase ‘keep my eggs warm’. Needless to say I will never live that one down. Just yesterday an electrician in the parking garage asked me how the bunny egg warmers were going.

One of my friends made them to use as place markers on her Easter table. I am making these for the two adorable little girls in my life and then for my family. My mature boyfriend had the bunny give birth to the egg multiple times after having made fun of me for how excited I was about the bunnies! So, I’m sure that your family, no matter the age range, can have fun with Easter egg cozies!
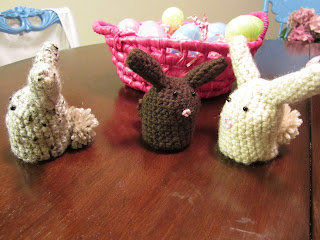
Aww they love each other!

Supplies:
Beige and pink yarn (I use Lion Brand Vanna’s Choice which was great!)
Size 4 crochet hook (the pattern calls for a 5 but I think that makes it too big and gauge does not matter)
Black beads
Plastic yarn needle

Crocheted Bunny Egg Cozy

Cozy:
Ch 2. Connect with sl st
Rnd 1: work 4 sc in loop. Place a marker in first st for beginning of round and move up as each round is competed. You do not connect each round with a sl st like a hat- just work in continuous rounds.
Rnd 2: work 2 sc ine ach sc around – 8 sc.
Rnd 3: *2 sc in next st, sc in next st, rep from *around – 12 sts.
Rnd 4: *2 sc in next st, sc in each of next 2 sts, rep from * around – 16 sts.
Rnd 5: *2 sc in next st, sc in each of next 3 sts, rep from * around – 20 sts.
Rnd 6: *2 sc in next st, sc in each of next 4 sts, rep from * around – 24 sts.
Rnds 7-14: sc in each sc around.
Rnd 15: *Sc2tog, sc in each of next 2 sts, rep from * around. Fast off.
Stitch explanation:
Sc2tog (sc decrease) Insert hook into st and draw up a loop. Insert hook into next st and draw up a loop. Yarn over, draw through all 3 loops on hook.

Ears: (make 2)
Ch. 2 and connect.
Rnd 1: work 4 sc in loop. Place marker in first st for beginning of round.
Rnd 2: *2 sc in next st, sc in next st, rep from * around – 6 sts.
Rnd 3: *2 sc in next st, sc in each of next 2 sts, rep from * around – 8 sts.
Rnds 4-8: sc in each st around. Fasten off.

Pompom:
Don’t get roped into buying a pom pom maker because if you have 2 fingers and a friend you can do it yourselves! Wrap your yarn around 2 fingers. Then have your friend insert a longer piece of the same yarn through the two fingers. Loosely tie the center, pull off your fingers, and then tightly secure your loops. Cut each loop in the middle so that it becomes a pom pom. Leave the yarn that you tied it with long so that you can attach it to your bunny.


Finishing:
Lightly stuff your ears with some cotton balls. Then using your yarn needle attach your ears to your bunny body. Then using the yarn needle and your pink yarn, embroider a triangle for a nose. Sew on beads for eyes. Attach pom pom tail. Weave in any excess ends.
Dancing bunnies!
And now put an easter egg inside it and make it hop around! You know you want to! And now you’re going to want to make bunnies as quickly as, well, bunnies makes bunnies!

Ebony and ivory?
Adapted from Lion Brand Yarn Company Wee Rabbit Egg Cozy

Tuesday, March 27, 2012

Easter Peeps S'mores


Oh these are so cute!!!  These could be used as a cute gift or table setting or party favor.  All you need is graham crackers, chocolate bars, Peeps, party bags, and ribbon. That’s right- here’s your excuse to buy Peeps!

In each baggy place two square graham crackers. Then place your chocolate. (Ok ya I could have used less chocolate!) You can either break a bar in half or buy the individually packaged Hershey’s. If you are doing bunny peeps then arrange them on top of each other and slide them in the baggy so the bunny is facing up. If you are doing chick peeps then put your grahams and chocolate in the baggy so they form a little table to place the chick on. Tie up your baggy with some cute ribbon and your adorable Easter s’mores baggy is ready to go!

Kudos to my creative sister Maria and Mom for this one!