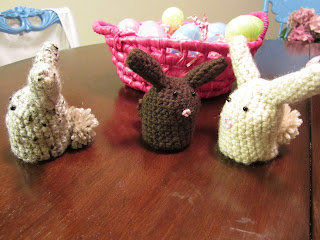
This is the most amazingly adorable crocheting project ever! I first made these when I was doing my practicum in peds oncology. It was 2am on our lunch break when one of the other nurses showed me how. I couldn’t find the pattern this year so I thought I would just call over from my floor to peds oncology one night at work. As soon as I hung up the phone all the other nurses and the electricians that were on our floor erupted in laughter. As I was trying to explain myself and the project I made the mistake of using the phrase ‘keep my eggs warm’. Needless to say I will never live that one down. Just yesterday an electrician in the parking garage asked me how the bunny egg warmers were going.
One of my friends made them to use as place markers on her Easter table. I am making these for the two adorable little girls in my life and then for my family. My mature boyfriend had the bunny give birth to the egg multiple times after having made fun of me for how excited I was about the bunnies! So, I’m sure that your family, no matter the age range, can have fun with Easter egg cozies!
Supplies:
Beige and pink yarn (I use Lion Brand Vanna’s Choice which was great!)
Size 4 crochet hook (the pattern calls for a 5 but I think that makes it too big and gauge does not matter)
Black beads
Plastic yarn needle
Crocheted Bunny Egg Cozy
Cozy:
Ch 2. Connect with sl st
Rnd 1: work 4 sc in loop. Place a marker in first st for beginning of round and move up as each round is competed. You do not connect each round with a sl st like a hat- just work in continuous rounds.
Rnd 2: work 2 sc ine ach sc around – 8 sc.
Rnd 3: *2 sc in next st, sc in next st, rep from *around – 12 sts.
Rnd 4: *2 sc in next st, sc in each of next 2 sts, rep from * around – 16 sts.
Rnd 5: *2 sc in next st, sc in each of next 3 sts, rep from * around – 20 sts.
Rnd 6: *2 sc in next st, sc in each of next 4 sts, rep from * around – 24 sts.
Rnds 7-14: sc in each sc around.
Rnd 15: *Sc2tog, sc in each of next 2 sts, rep from * around. Fast off.
Stitch explanation:
Sc2tog (sc decrease) Insert hook into st and draw up a loop. Insert hook into next st and draw up a loop. Yarn over, draw through all 3 loops on hook.
Ears: (make 2)
Ch. 2 and connect.
Rnd 1: work 4 sc in loop. Place marker in first st for beginning of round.
Rnd 2: *2 sc in next st, sc in next st, rep from * around – 6 sts.
Rnd 3: *2 sc in next st, sc in each of next 2 sts, rep from * around – 8 sts.
Rnds 4-8: sc in each st around. Fasten off.
Pompom:
Don’t get roped into buying a pom pom maker because if you have 2 fingers and a friend you can do it yourselves! Wrap your yarn around 2 fingers. Then have your friend insert a longer piece of the same yarn through the two fingers. Loosely tie the center, pull off your fingers, and then tightly secure your loops. Cut each loop in the middle so that it becomes a pom pom. Leave the yarn that you tied it with long so that you can attach it to your bunny.
Finishing:
Lightly stuff your ears with some cotton balls. Then using your yarn needle attach your ears to your bunny body. Then using the yarn needle and your pink yarn, embroider a triangle for a nose. Sew on beads for eyes. Attach pom pom tail. Weave in any excess ends.
 |
| Dancing bunnies! |


These are adorable! They are making me wish I knew how to crochet a little more than just long chains so that I could make them for my favorite adorable little girls!
ReplyDelete